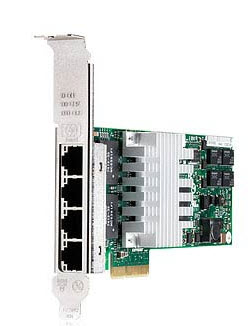
Installing the HP NC365T in ESX4iU1

The HP NC365T 4 port nic is supported in ESX4iUpdate1 but is not recognized by default.
What I need to do before it is recognized, is to install the Intel driver for this card.

First you need to install the Vmware remote CLI

http://www.vmware.com/download/download.do?downloadGroup=VCLI41

Next you need to download the right package:

Link

Unzip de ISO en look for INT-intel-lad-ddk-igb-3.0.18-offline_bundle-396986.zip in the offline-bundle directory.

Put the zipfile in an easy directory like c:\vmware

Now we need to put the server in maintenance mode before we can install the driver package.

Start the Vmware CLI and use the following command: (do not copy, type instead)

vihostupdate.pl –server 192.168.1.1 –install –bundle c:\vmware\ INT-intel-lad-ddk-igb-3.0.18-offline_bundle-396986.zip.

Type your username and password. After this the update is installed you need to reboot the server before he recognized the NIC.

How to recover your VMware ESX root password

I just came across a blog which linked my SRM in a box document. It was started a few days ago and is called:

Lewan-Ent Sytems and storage blog

Browsing around i found an excelent post about how to recover your root account in ESX.
Some times i come around customers and they installed ESX a long time ago and can’t remember the password. Or they only manage esx with vCenter with the administrator password so they forget the root password.

I suggest you print this one in pdf format and carry it along with you, just in case you might need this!

You can find this post here: http://lewaness.wordpress.com/2009/01/06/esx-35-server-lost-root-password-reset/

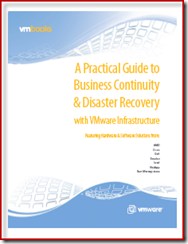
Disaster recovery book from VMware, FREE step by step with Netapp guide!

This free Disaster recovery book shows how to configure ESX to setup disaster recovery with a Netapp. This is a must read for everyone involving Netapp and VMware ESX.

This will guide you through all kind of considerations about Disaster Recovery settings and shows you how to configure your Netapp appliance to accomplish this for your site.

Right click and choose save to download the document:

image

Ten tips on de-duplicating your VMware shared storage on Netapp

When you are using VMware esx with the enterprise features you have to store your Virtual Machines on shared storage like Netapp provides. As everybody knows your storage usage will explode immediately. It isjust too easy to create multiple virtual machines that will eat up your storage space.

At the VMUG 2008 event I took a look on the presentation from Eric Sloof where he was showing a power shell script which can batch create multiple vm’s in a minute with one mouse click. You can imagine what this script will do for your storage environment.

Netapp added a big value to VMware storage utilization by providing De-duplication. Especially in a VMware environment where VM primary partitions are the same for about 80%. De-duplication scans these volumes where the vm’s resides and removes all the double blocks and create pointers to them.

The fun thing about De-duplication is the answer on what does it cost on Netapp? It is free! At least for the latest FAS systems. It is not available to R100, R150, FAS250, FAS270, and products that are within the range of the 800 or 900 series.

To give you a quick start on the usage of de-duplication I wrote ten tips on using it in your VMware environment:

1.) De-duplication is a scheduled process. Default it will run every night. So when you do storage Vmotion from a non de-duplicated volume to a de-duplicated volume it is not de-duplicated immediately. Be sure you have calculated this before you do a storage vmotion

2.) Be sure to set “fractional reserve” in a de-duplication volume not at 100%. The reason is that when you de-duplicate the volume, all free space will be added to the fractional reserve pool. So you never get any in the volume where your data resist. When you set fractional reserve at 20%, only 20% of the free blocks are added to “fractional reserve pool and the other 80% to your volume free space!

3.) Use NFS volumes for your VM’s. NFS is far the most flexible storage provisionary for VMware. You can thin provision VM’s and resize NFS volumes on the fly when you want to use De-duplication space savings for another volume.

4.) Place your VM swapfiles on a different Volume. It is best practice for VMware esx environments to place your swap files on a dedicated swapfile volume. Swap files do not have much identical blocks which cab de-duplicated.

5.) Be sure that everyone who has access at the volumes to understand what De-duplication does and what they need to know what happens with data that migrates or is being copied to other volumes/clients. This could prevent volumes to go offline or other data corruption, because it is un-de-duplicated when copied to unsupported storage.

6.) Schedule the De-duplication process at time frames where there is no data access like production or backup windows.

7.) Be sure to not create a Netapp snapshot while the de-duplication process is running, because the metadata can be locked inside the snapshot. (this data is within 1-3% overhead) Instead create a snapshot before de-duplicating. Afterwards Snapshots are not de-duplicated!

8.) Use the best practice for volume provisioning to ESX environments. Provide a 500 GB volume as the maximum. This will always let Netapp De-duplicate your storage on any FAS system. This is also a best practice for ESX performance.

9.) Always place the same OS vm’s in the same volumes. Create volumes per OS. This will free up more space in your volumes.

10.) To get the most out of your De-duplicated space savings, split up OS disks and data disks on different volumes. More duplicated blocks in a volume give you more de-duplicated space!

Commands to start with de-duplication:

First to enable De-duplication on a Netapp volume:

sis on “Volume name”

Next to start a De-duplication process for the first time. (after this a default schedule will de-duplicate your volume every night.

sis start -s “Volume name”

To start the process manually:

sis start “Volume name”

To display the status of the process:

sis status [-l] “Volume name” (in advanced mode)

To see your space savings:

df –s

To stop your De-duplication process. (It will stop your schedule as well).

sis stop “Volume name”

To turn it off:

sis off “Volume name”

To un-De-duplicate your Volume:

sis undo “Volume name”

SRM in a Box final release (the complete setup)

Finally I’ve just finished the complete pdf on “Building a VMware Site Recovery Manager demo with the Netapp simulator” This document will guide you trough the setup of Site Recovery Manager with the Netapp simulator, just on 1 host. I changed a few things since the preview document so ctrl_del the preview document and download the latest one here.
If you have any comments to improve this document please feel free to contact me at tomas@tendam.info.

19-11-08 Update1: Arne from ict-freak.nl asked me: why did you choose for a solaris LUN and not for a Vmware lun at page 29. I made a mistake here, you should use a VMware lun. Updating the document right now
19-11-08 Update2:Updated the document showing a VMware lun at page 29
Update3:A new pdf with another virtual appliance is comming soon click here
18-12-2008 Update 4: John Balsillie, a VCI from australia emailed me about 2 things in the PDF which he found strange. The first thing is about page 37. On this page i am writing: Create instead of 10 gb an 8 gb data store because you might need the storage for the replication I forgot to delete this before publishing, so you can ignore this. Just create 8gb. This was before i did the whole configuration.
The scond thing was on page 23. John found out that the commands where not correct.

To set up snapmirror correctly use these instead:

on NetApp01 – enter “options snapmirror.access host=natapp02”
and
on NetApp02 – enter “options snapmirror.access host=natapp01”

John, thanks very much for noticing these mistakes! I will update the document later.

Download the document here:

SRM in a Box Final

However this wil guide you to setup Site Recovery Manager in a box, this is not an indepth guide into SRM. For an indepth guide i have to point you to http://www.rtfm-ed.co.uk/ Mike Laverick just released his book “Administering VMware’s Site Recovery Manager”

“SRM in a Box”: configured! (site recovery manager)

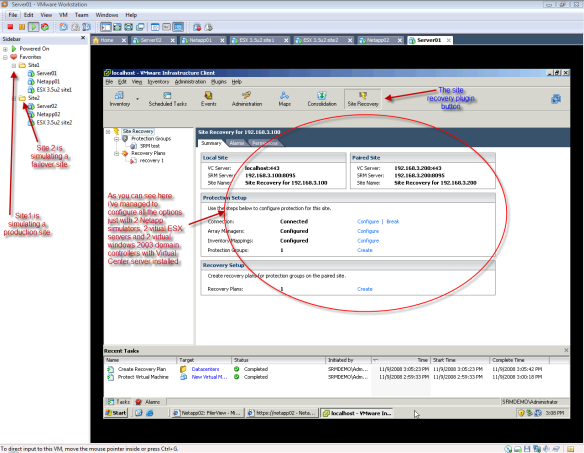
After a few difficulties i have managed to set up a SRM (site recovery manager) in a Box configuration with the free Netapp Simulator. The problem i had in the previous post, was because i had no data in the volume that has to be snapmirrored. So i created a vm and did an snapmirror update and voila, the LUN was shown in the array configuration. Now i have to create a few vm snaps 😉 before i am going to run the protection plan. Here is a first picture. I will discribe the steps i did in a document as soon as i can.

Update: A complete howto is available now: Get it here

SRM workstation overview

SRM workstation overview

Setting up “SRM in a Box”

Currently i am trying to setup a “SRM in a Box” configuration.However it is not working right now.

This is what i use:

1 hp proliant dl 110 g5 with 6 gb ram and a 500 gb hd with Vista buisiness installed.

On this server i’ve installed workstation 6.5.

In Workstation i created 2 folders names site 1 and site 2. In this folders i created 3 vm’s each.

in site 1:

1 vm with windows 2003 as a domain controller and Virtual center server with 768 mb ram
1 vm with Ubuntu desktop with the Netapp simulator serving 20 gb of iscsi storage with 512 mb ram
1 vm with a working ESX 3.5 update 2 with 1024 mb ram

in site 2:

1 vm with windows 2003 as a second domain controller and Virtal center server with 768 mb ram
1 vm with Ubuntu desktop with the Netapp simulator serving 20 gb of mirrored storage with 512 mb ram
1 vm with a working ESX 3.5 update 2 install with 1024 mb ram

At this time i have managed to setup SRM to see both storage sites, but i was unable to see a mirrord lun in the SRM storage configuration. Even if i do a rescan in the SRM dialog box it won’t display a mirrord lun. I am sure that i setup the snapmirror in a good condition.

Maybe the unsupported update 2 configuration is messing up things, or the simulator is failing on this one. Soon i wil post a detailed step by step guide if i manage to setup a complete working configuration.

Access Based Enumeration for Netapp shares

To enable acccess-based enumeration (ABE) on a netapp share we need the commandline. Just connect with putty or something else to your netapp where the share resides.

To set ABE to on, use the nest command:

cifs shares -change sharename -accessbasedenum

To turn ABE off, use the command:

cifs shares -change sharename -noaccessbasedenum

Update:
Like Christoph says in the comments you can enable ABE from the commandline tool abecdm.exe just from a windows server, so you don’t need the commandline from a Netapp.

If you do not have this tool you can download it here:

http://www.microsoft.com/downloads/details.aspx?FamilyId=04A563D9-78D9-4342-A485-B030AC442084&displaylang=en

Logon a Netapp CIFS share authenticated by a windows 2008 domain controller

Today i had a problem logging in to a netapp share with a computer who is not a member of the domain. for the first time i have installed a netapp storage box with a windows 2008 domaincontroller for authentication.

Usally when the login box shows up, i try to login on like this:

domainname.local\administrator
password

somehow did did’nt work. I reconfigured the netapp to autenthicate, but no solution.
I used a windows xp workstation. When i try to logon from a Vista client it did work.
Now i was confused. Eventually i found a way to login using the User principal names

administrator@domainname.local
password

Ofcourse this has something to do the way authenciation is working between Vista clients, XP clients and a windows 2008 domain controller. However it frustrated me for about 1 our.